Pages

Showing posts with label breakfast. Show all posts

Monday, June 20, 2016

Perfect Pancakes Recipe

Pancakes are one of my favourite breakfast foods due to their versatility. You can pair them with a variety of fruits (incorporated into them or fresh cut on top of them), add other sorts of mix-ins (chocolate chips, anyone?), or serve them plain. Real maple syrup is always a winner in our house, but sometimes my husband likes to use plain pancakes as the outside of a sandwich, adding some eggs, cheese, and bacon or sausage between it.

Better yet? They freeze really, really well. Make extras and freeze them in a huge gallon freezer bag, and you can pull some to toast or microwave for a quick, yummy breakfast some other time! For easier storage, put pieces of wax paper between the pancakes and don't freeze them until they've cooled down completely.

Anyway you look at it, pancakes are awesome.

Yes, I accidentally let one get a bit too brown. Oops! Still tasted good, though! You can see some of them have chocolate chips mixed in, others don't. 
Problem is, for the longest time we didn't have a good recipe. We tried recipe after recipe, and we finally stumbled across a winner. Actually, we stumbled across this recipe over a year ago. We've used it multiple times since then, and it's always fabulous. The only reason I never shared it before now is because I kept forgetting to take pictures!

(I apologize in advance for the quality of food pictures on my blog. I only have a cell phone camera to work with right now. I try to make the best of it, though!)

The following recipe was found on Allrecipes.com and is for 4 servings. You can change the number of servings you want on the website and it will do all the adjustments to the ingredients for you, though. I normally double the recipe, but if I'm freezing anything I triple it.

FLUFFY PANCAKES

INGREDIENTS:

  • 3/4 Milk
  • 2T white vinegar
  • 1c all-purpose flour
  • 2T white sugar
  • 1t baking powder
  • 1/2t baking soda
  • 1/2t salt
  • 1 egg
  • 2T butter, melted
  • cooking spray (or whatever you prefer to grease your pan)

1) Combine milk with vinegar in a medium bowl and set aside for 5 minutes to "sour" (aka: make buttermilk).

2) Combine flour, sugar, baking powder, baking soda, and salt in a large mixing bowl.

3) Whisk egg and butter into buttermilk/soured milk.

4) Pour the flour mixture into the wet ingredients and whisk until smooth.

Fully mixed batter. Now is the time to mix in any extras like chocolate chips or berries!
5) Heat a large skillet over medium heat and grease. Pour 1/4c of batter onto the skillet, cooking until bubbles appear on the surface. Flip, and brown on other side.

Due to sodium restrictions Bobble has from previous medical issues, we use a sodium-free baking powder to help reduce the sodium content of the pancakes.

I like to use butter to grease my pan before cooking the pancakes, and I like to mix in chocolate chips or berries. I've also become rather fond of adding some cinnamon to the batter or very lightly sprinkling some cinnamon on them as soon as I put the batter in the pan. So yummy!

If you're in need of a pancake recipe, you should definitely give this one a try!

Disclaimer: Thoughts of Fluff is responsible for the content of this post. The recipe is the Fluffy Pancakes Recipe from AllRecipes.com. All opinions are my own and may differ from those of your own.

Monday, October 6, 2014

Donuts From Scratch


I tried my hand at a recipe I'd been eying for a while from Mary Quite Contrary Bakes. It was for strawberry donuts. Yum! I changed a few things up due to ingredients on hand, but it was still really tasty. They were super easy to make, and I liked knowing what was in them.

My whole family loved them, but I loved them enough to accidentally eat enough to get a stomach ache. Twice. I suppose that is part of the curse of making mini-donuts, eh? Mini are always easier to eat!

Strawberry Glazed Doughnuts (From: Mary Quite Contrary Bakes)
Servings: 10 doughnuts (or roughly 24 mini donuts)
Ingredients:
Doughnuts:
  • 1 cup flour
  • 1/3 cup sugar
  • 1 tsp baking powder
  • 1/4 tsp cinnamon
  • 1/2 tsp salt
  • 1/3 cup milk
  • 1 egg
  • 1 tbsp melted butter
  • 10  medium to large strawberries (between 1/2 and 3/4 cup depending on size), pureed with 2 tsp seedless strawberry jam
  • 1 tbsp pure maple syrup
Glaze:
  • 3 cups powdered sugar
  • 1/2 teaspoon salt
  • 1/2 teaspoon vanilla
  • 1/2 cups cold milk
Directions:
Preheat oven to 425 degrees.  
Grease a 6-doughnut pan with baking spray.  
To make doughnuts combine dry ingredients in a large bowl and whisk together.  
Create a well in the center of the dry ingredients and add in milk, egg, butter, and maple syrup.  
Stir until well combined.  
Stir in strawberry mixture, starting with 1/2 of it and adding more only if needed.  Batter should be wet, but not runny.  
Put dough into a pastry bag or plastic bag and snip approx 1-inch off end.  
Pipe batter into each well, reserving extra batter.  
Bake for 7-9 minutes until doughnuts spring back when touched.  
Let cool five minutes and turn onto a cooling rack to cool completely.  
Spray pan again and continue with the rest of batter until all doughnuts have been made.  
While doughnuts are cooling make glaze.  
To make glaze, stir all ingredients together until smooth.  
When doughnuts are cooled dip each into glaze (twice if you want to be naughty about it) and place back on cooling rack to let glaze set.  
When glaze has set enjoy!


I had a perfect consistency after adding 1/2 a cup of strawberry puree, so I didn't add any more. I also didn't add any strawberry jam. My donuts did not taste like strawberry, though they were a light pink. I'm not complaining, they were delicious! If you want that strawberry flavour, add more than 1/2c.

Pictures of the process!

ready to bake!
baked!


They ended up being fully dipped in the glaze mixture 1x each, and they were plenty sweet enough for us! I ended up with a bunch of glaze left over, actually. I had to throw it away. I would definitely cut the recipe in half for the glaze next time.

These were super easy to make, and super easy to eat. I had never made donuts before in my life, so you can see that they aren't perfect but still can tell they are donuts. I call that a win. Next time I'll fill the pan a little less full so there is more of a pronounced hole. I assume that will actually give me about 30-36 mini donuts instead of the 24 I got.


Disclaimer: Thoughts Of Fluff was not compensated for this post. All opinions are my own and may differ from those of your own. Post contains affiliate links.

Sunday, October 5, 2014

MOMables Spinach & Cheese mini quiches (GF)

Both of my children love eggs, so when I saw the mini quiche recipe in my MOMables GF Menu, I decided we had to make them. We have fresh spinach growing in our garden, so I was able to just grab a few leaves the night before, too.

This is not one of the free recipes, so this exact recipe will not be shared. It is similar, however, to this free recipe for Crustless Broccoli and Cheddar Quiche "Muffins" that is free.

Our Mini Quiches right out of the oven!
Bobble helped me count the ingredients out, mix the ingredients, and open the oven door for me. It was so simple, however, there really wasn't much for him to do! I was trying to invent things (such as counting the eggs as I put them in).


They mixed up quickly and cooked quickly. The thing that took the most time was putting them in the pan!

Bobble holding a mini quiche (bite missing)

*Tip: Use the (already dirtied) tablespoon to scoop the batter into each mini muffin slot. It's the perfect size!

Enter for your chance to win a 3 month subscription to MOMables and get more great recipes like this one!

Disclaimer: Thoughts of Fluff was provided with a trial to MOMables in exchange for a review. This did not sway my opinion in any way. All opinions are my own and may differ from those of your own.

Sunday, August 3, 2014

Crockpot French Toast


In an attempt to make breakfast easier for everyone, I decided to go with some crockpot french toast. Preparing the dish was simple, and cooking it was simple. The taste was good, though hubby and I both agreed we would prefer to just make french toast on the stove top. The kids devoured it and loved it. That, alone, is reason enough for me to make it again.

It was super simple, but cleanup wasn't as easy as it could have been. Despite greasing the crockpot, I still ended up with a baked on layer. Not burnt, mind you, just baked on. I'd recommend placing wax paper inside to avoid this.


Crockpot French Toast
·         10 Slices of Bread
·         6 Eggs
·         2 c. milk
·         1 T. light brown sugar
·         1 t. cinnamon
·         1/2 t. nutmeg
·         1 t. vanilla
·         1/2 c. raisins (optional)

1) Grease the inside of your crockpot with butter or coconut oil.
2) Cut bread into bite-size pieces and place in crockpot. If adding raisins, mix raisins in now. (Bread can be cut larger, or even left whole, though bite size pieces now make it easier to serve up later.)
3) Mix together eggs, milk, brown sugar, cinnamon, nutmeg, and vanilla.
4) Pour mixture over bread, gently pressing down on the bread in areas that might not have been saturated. (If leaving bread whole, you might want to dip the bread in the mixture before placing in the crockpot and pouring the extra over the top.)
5) Cover and cook on low for 6 - 7 hours.
Baked, complete with horrible morning lighting!
6) 10 - 20 minutes before serving, uncover crockpot and melt some butter on top of the french toast, sprinkling with cinnamon and sugar if desired.

cinnamon and sugar covered
syrup covered


Disclaimer: Thoughts of Fluff was not compensated for this post. All opinions are my own and may differ from those of your own. Post contains affiliate links.


Monday, July 28, 2014

Apple Crepes


This morning was another breakfast made out of the Russian, German & Polish food & cooking cookbook. Yes, that is my favourite cookbook. I actually tweaked the recipe for the filling, so it's not exactly out of the book. I guess it's based on the recipe in the book.


This recipe was out of the "Central European" section (thus the French influence). It was really easy to make, though time consuming to do all at once. Next time I'll have the filling made the night before and then just warm it before filling the crepes. It wasn't exactly easy to wash, slice, and cook the apples while trying to entertain a 1yo and 3yo! It said to peel the apples, but I just didn't have time for that.

I either mastered the technique for making crepes, or this recipe for the crepe batter is far superior to the other one I tried. Honestly, I think I've just mastered the technique. I remember the Polish Crepes tasting pretty darn tasty.

Anywho, slicing and cooking the apples aside, it was a very easy recipe that everyone loved. You could easily have baked the apples and used that as a filling instead, if desired.

The most important thing I learned from this recipe was how to keep the cooked crepes warm while I make the rest. GENIUS idea! You place a small pan of simmering water on a burner near by and the plate atop that simmering pot. As you remove the crepes, place them on the plate and cover with aluminum foil. This will be so handy for so many other things that I want to keep warm so I can serve everyone at the same time! Scrambled eggs, hash browns, burrito shells so they can be rolled at the same time.... the list goes on

I didn't dust the crepes with anything, nor did I serve with lemon wedges. They were great as-is! (Yes, even with the skins on.)

Apple Crepes

Ingredients:
  • 1c flour
  • Pinch of salt
  • 2 eggs, beaten
  • 3/4c milk
  • 1/2c water
  • 2T butter, melted
  • Sunflower Oil (for frying)
  • Cinnamon sugar or confectioners' sugar and lemon wedges, to serve (optional)

For the Filling:
  • 4T butter
  • 2# apples (Cored, peeled, and sliced)
  • 1/4c sugar
  • 1t cinnamon
Directions:

1) Melt the 2T of butter in a pan for the filling. When the foam subsides, add half of the apple slices and sprinkle on half of the cinnamon & sugar mixture. *I was using a 10" skillet for this. If you have a much larger skillet, you could do all the apples, butter, and cinnamon/sugar mixture at once*


2) When apples are soft and golden brown, set aside in a bowl and cook other half of apples like above, then set aside.


3) Sift the flour and salt in a mixing bowl, making a well in the center to add the eggs. Pour beaten eggs into the well and slowly mix in the flour.


4) Combine milk and water in a cup and slowly add to the flour/egg mixture in the mixing bowl. Beat until smooth. Stir in the melted butter.

5) Heat 2 teaspoons oil in a frying pan. Pour in approximately 2T of batter, tilting the pan to coat the bottom evenly.


6) Cook the crepe until the underside is golden brown, then flip. Slide crepe onto a warm plate, cover with aluminum foil, and set the plate on a pan of simmering water to keep warm. Repeat with remaining batter mixture until gone.


7) Divide the apple filling among the crepes and roll them up. Sprinkle with cinnamon sugar or a dusting of confectioner's sugar, if desired. Serve with lemon wedges to squeeze on top.


Disclaimer: Thoughts of Fluff was not compensated for this post. All opinions are my own and may differ from those of your own. Post contains affiliate links.

Friday, July 25, 2014

Polish Crepes


This breakfast is brought to you by a cookbook I've been giving a lot of love lately, the Russian, German & Polish Food & Cookingcookbook.

I was very hesitant to make this as the main ingredient in the filling is something I've never liked: ricotta cheese. However, I thought I should give it a try. It looked delicious in the pictures, and who knows? Maybe, as a sweeter item, ricotta might not be so bad?

For the record, I always disliked that weird, chalky taste/texture of ricotta. Always.

My crepes were in between pancakes and crepes in terms of thickness, but that's because I've never made EITHER before (yes, you read that right... never have I made a pancake or a crepe before trying this recipe). The last few I made were perfectly thin, but most of them were a bit thicker. Still, it worked well.


Everyone loved them, though.... except only Squiggle enjoyed the filling. Hubby ate it but wasn't overly fond. Bobble insisted I scrape his out and I thinned my filling out but still ate it. We omitted lemon for garnishing, but I served it with lemonade. Totally the same thing, right? It did go well, however. I'd definitely make the crepes again, though I might not use this filling. If you like ricotta however, I'd definitely recommend trying it!


Polish Crepes
Makes 6

Ingredients:
- 1c all-purpose flour
- pinch of salt
- pinch of grated nutmeg, plus extra for dusting
- 1 egg, separated
- scant 1c milk
- 2T sunflower oil
- 2T butter
- lemon slices, to garnish

For the filling:
- 1c ricotta cheese
- 1T sugar
- 1t vanilla extract
- scant 1/2c golden raisins

Directions:
1) Sift flour, salt, and nutmeg in a bowl. Make a well in the center and add the yolk and half of the milk. Beat until smooth, then gradually beat in the remaining milk.
2) Whisk the egg white in a bowl until stiff, and fold into the batter.
3) Heat 1t sunflower oil and a little butter in a 7" frying pan. Pour in enough of the batter to cover the bottom.
4) Cook for 2 min. on each side.
5) Repeat until batter is used adding more oil and butter as needed. Stack crepes and keep warm.
6) Mix ricotta, sugar, and vanilla in a bowl and beat together. Mix in the raisins. Divide amongst crepes, fold the crepes, and dust with grated nutmeg. Garnish with lemon slices.

Disclaimer: Thoughts of Fluff was not compensated for this post. All opinions are my own and may differ from those of your own. Post contains affiliate links.

Tuesday, July 15, 2014

Buttermilk Blueberry Breakfast Cake

My first ever pinterest "win" was the recipe I'm about to share. This recipe is a favorite of mine, and I love making it when I can get fresh blueberries from the farmer's market. Of course, I love making it regardless, the fresh, local, no-spray blueberries just make it that much better! (And here's the link to my repin of their pin, with a much nicer photo than mine.)


Buttermilk-Blueberry Breakfast Cake
Serves 6-8
  • ½ cup unsalted butter, room temperature
  • 2 tsp. lemon zest or more — zest from 1 large lemon
  • 7/8 cup* + 1 tablespoon sugar**
  • 1 egg, room temperature
  • 1 tsp. vanilla
  • 2 cups flour (set aside 1/4 cup of this to toss with the blueberries)
  • 2 tsp. baking powder
  • 1 tsp. kosher salt
  • 2 cups fresh blueberries
  • ½ cup buttermilk***
* 7/8 cup = 3/4 cup + 2 tablespoons
** This 1 tablespoon is for sprinkling on top
*** To make homemade buttermilk, place 1 tablespoon of vinegar or lemon juice in a liquid measuring cup. Fill cup with milk until it reaches the 1-cup line. Let stand for five minutes. Use only 1/2 cup of the prepared mixture for the recipe.
  1. Preheat the oven to 350ºF. Cream butter with lemon zest and 7/8 cup of the sugar until light and fluffy.
  2. Add the egg and vanilla and beat until combined. Meanwhile, toss the blueberries with ¼ cup of flour, then whisk together the remaining flour, baking powder and salt.
  3. Add the flour mixture to the batter a little at a time, alternating with the buttermilk. Fold in the blueberries.
  4. Grease a 9-inch square baking pan (or something similar) with butter or coat with non-stick spray. Spread batter into pan. Sprinkle batter with remaining tablespoon of sugar. Bake for 35 to 45 minutes. Check with a toothpick for doneness. If necessary, return pan to oven for a couple of more minutes. (Note: Baking for as long as 10 minutes more might be necessary.) Let cool at least 15 minutes before serving.

     Recipe by Alexandra Stafford of www.AlexandraCooks.com

Friday, July 11, 2014

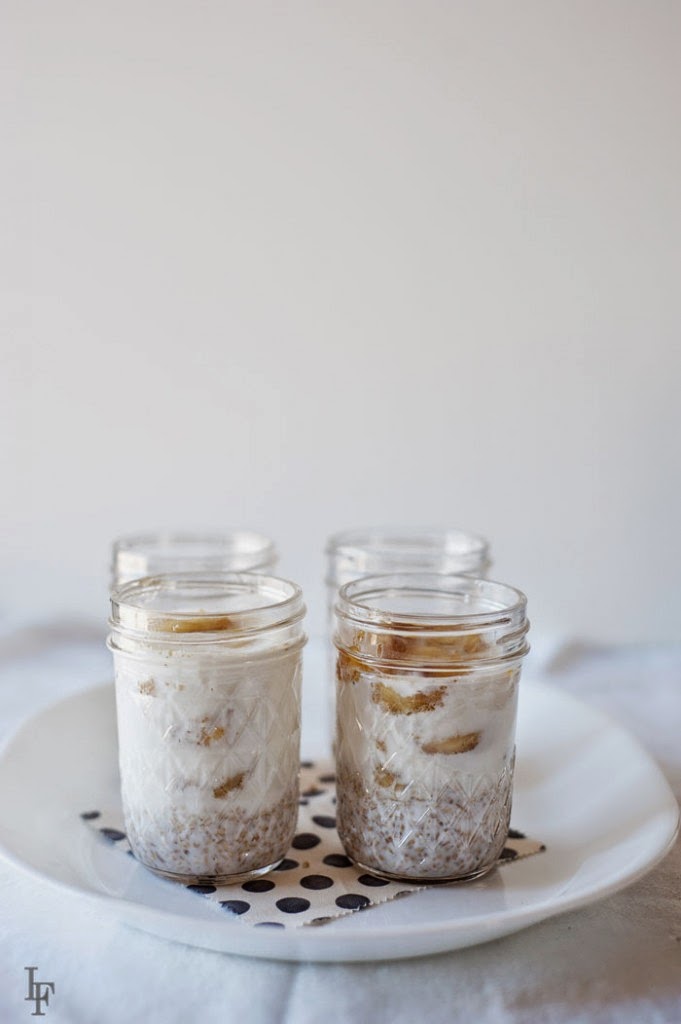
Bananas Foster Overnight Oats Recipe/Review

After the banana bread was made yesterday, I still had 3 extremely ripe bananas. (So ripe, in fact, that when I picked one up to slice it for this recipe, it broke open.) I had this recipe pinned for a while and figured it was the perfect opportunity to give it a go. It's from the mother who brought us MOMables, so right there you know it has to be good!

I've never been a fan of oatmeal, but I do enjoy oatmeal cookies, so there is always the possibility I might find something I like with oats. This recipe was unbelievably easy. I was skeptical about a few things, especially since I'd never made anything like this, but it turned out to work.

I bought some steel cut oats (you are supposed to use those, also known as "Irish Oats", instead of the flat oats). It called for ground flax seed, too. I bought a bit of that (whole). I got a huge workout last night, as I didn't realize how thin and flat flax seeds were, and I was grinding them myself via mortar and pestle. In worked, just was more difficult than I had anticipated. I bought both the oats and the flax from our local health food store. They get that sort of stuff in bulk and measure out smaller quantities, so I was able to get much less than I would have had to buy at a grocery.

www.supergluemom.com/bananas-foster-overnight-oats-recipe/


Like I said earlier, this was super easy to make. It really was. I'm eating it as we type. I didn't have 4 of those little canning jars, but I had 2 that were bigger, so I just doubled the amount put in each jar. Harder to eat out of, though! I ate the first half (of my serving... there are now 2 servings in each of my jars) cold, and I warmed up the second half. It says you can eat it either way, so I thought I'd try both.

It's a different consistency than oatmeal that is instant, that's for sure! It's chewier (like tiny warmed nuts or something.... wow that sounds just all sorts of wrong! lol ), but it's good. Hubby says I should have skipped the flax seed, but it was only added in for nutrition.

I liked the result cold, and warm it's reminiscent of banana bread. Either way, I ate all my food. I'm not the biggest fan of bananas, and I never really cared for oats... but I'd make this again. Not daily (unless you're a huge oatmeal fan!), but I will make it in the future. Very little work to wake up and already have a breakfast made that is tasty and healthy. Win!

I ate this the morning after it was made, and then again 3 days later (to see how taste held up). It tasted just as good later as it did earlier. I also made this again and put it in mugs instead. That worked nicely, too. 

Bananas Foster Overnight Oats Recipe
Prep time: 5 mins Cook time: 5 mins Total time: 10 mins
Author: Laura Fuentes - SuperGlueMom Serves: 4

Ingredients:
  • 1 teaspoon coconut oil*
  • 3 very ripe bananas, sliced
  • 2 teaspoons vanilla
  • ¼ teaspoon cinnamon
  • 2 tablespoons maple syrup
  • 1 cup steel cut oats*
  • 2 teaspoons ground flax
  • 2 cups milk*
Instructions
  • In a small saucepan, heat up coconut oil over medium heat. Add bananas, vanilla, and cinnamon to the heated pan and begin to sauté until they begin to break down and juice out its natural sugars - about 2-3 minutes.
  • Add maple syrup, stir to combine and cook for another minute, remove from heat.
  • Place ¼ cup steel oats, ½ teaspoon ground flax, and ½ cup milk inside each of 4 glass jars. Divide cooked bananas evenly over each glass jar.
  • Stir to combine and refrigerate overnight.
Notes: - You can use butter instead of coconut oil and your favorite dairy free milk as well. If you use old fashioned oats, reduce milk to 1½ cups. - You can eat your oats cold right out of the fridge or warmed in the microwave.

Disclaimer: Thoughts Of Fluff was not compensated for this post. All opinions are my own and may differ from yours.

Thursday, April 17, 2014

MOMables Recipe Review (8)

Anyone out there love pancakes? If you love pancakes and haven't tried crepes yet, what are you waiting for? Crepes are delicious, too! Unfortunately, finding a crepe box mix that is simply delicious isn't the easiest to do, and restaurants seem to be hit-or-miss. Lucky me, one of the MOMables recipes I got was for some Strawberry Nutella Crepes, and the crepe batter recipe it included is the best I've ever had! To learn more about MOMables (and to enter the giveaway for 3 free months!), go here!

Since this recipe is not one of the free recipes, the actual recipe itself will not be shared.

My husband is the pancake maker, so I asked him to make the crepes. (If you're curious, it's pronounced cr-eh-p... like the 'e' sound in 'text' or 'yep'. If you are saying cray-p, you are referring to a type of paper.) The best part about that (aside from having breakfast made for me) is I got to take more pictures during their creation because I was not busy!

The batter was super simple for him to make, and they were cooking before I knew it.


Strawberry nutella goodness all rolled up and ready to eat! MOMables even offered a Nutella alternative... a nut-free nutella you can make yourself! That recipe is free, so here ya go!

I devoured my crepes as quickly as they were being made, and Squiggle wanted to help, too. She cruised right over to steal my food from me! She only got pieces of crepe without anything on them, but she made no secret of the fact that she loved them!


This crepe batter was so easy and so delicious, in fact, that it inspired my husband to try and make his own beer batter from scratch that night to bread and fry fish with. (Also the best beer batter we've EVER had at home.... all thanks to MOMables inspiring him!) Overall, best crepes I've ever had (actual crepe batter), and delicious filling! These will be made again and again in this house!

Disclosure: These opinions are my own and may differ from those of your own